Otto von Bismarck's plan to destabilise the Duchy of Strackenz so that it can be 'incorporated' into the German (actually Prussian) sphere-of-influence has come to fruition. A number of disturbances – including some anti-Danish street demonstrations, the looting of a few shops and houses belonging to Danish merchants, and the burning down of the offices of a Danish-language newspaper – have broken out in Strackenz City. The Strackenzian Army has attempted to restore order, and leading members of the German community have accused them of only arresting German-speaking members of the population. Outside Strackenz there have been calls for some form of 'intervention' to protect Germans living in the Duchy ... and this has been backed by the Prussian Government.
The Prussians have put pressure on the Grand Duke of Mecklenburg to send troops into Strackenz 'to restore order' ... and he has rather reluctantly agreed to do as he has been asked. (This ensures, of course, that von Bismarck can claim that it is a German rather than a Prussian 'intervention'. The old boy was no fool!) To this end three infantry battalions and an artillery battery of the Mecklenburg Army have marched across the border and are making their way towards Strackenz City.
In response an infantry battalion (1st Battalion, Strackenz Grenadiers) and an artillery battery of the Strackenzian Army – under the leadership of Marshal von Saldern, the Constable of Strackenz – have taken up positions astride the road leading from Mecklenburg to Strackenz City. They have occupied the western side of the only bridge across the river ... a bridge that the invaders must cross if they are to reach Strackenz City.
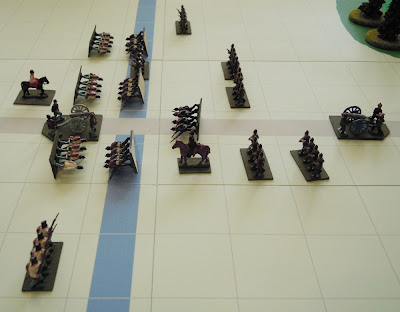
The opening positions
The Strackenzians have occupied positions astride the road on the western side of the river.
![]()
The Mecklenburgers will emerge from the forest covering the Jotun Gipfel along the road from the Strackenz-Mecklenburg border.
![]()
Turn 1
The leading infantry company of the Mecklenburgers advanced down the road towards the bridge, followed by the rest of the battalion.
![]()
Turn 2
The Strackenzian artillery battery opened fire ... and hit and destroyed the foremost Mecklenburg infantry company!
![]()
The remainder of the leading Mecklenburg infantry battalion began to deploy. They were followed out into the plain by their commander and three companies of the second Mecklenburg infantry battalion.
![]()
Turn 3
The Strackenzian artillery fired for a second time ... and destroyed yet another Mecklenburg infantry company!
![]()
The Mecklenburgers were determined to get to grips with the Strackenzians as quickly as possible, and whilst two of their infantry companies advanced as quickly as they could towards the river, the rest of the Mecklenburg troops began to deploy behind them.
![]()
Turn 4
The Strackenzian artillery battery fired for a third time ... and missed! This gave the Mecklenburgers the opportunity to continue their deployment and to bring their artillery battery closer to the river.
![]()
Turn 5
The Strackenzian artillery battery opened fire on the Mecklenburg infantry company that was directly in front of it ...
![]()
... and destroyed it. The Mecklenburg artillery battery returned fire, but its shot landed behind the Strakenzian artillery battery.
![]()
Having gained the initiative this turn, the Mecklenburg infantry advanced, and several infantry companies began to wade across the river ... a course of action that the Strackenzians had expected.
![]()
The resultant fighting was intense, and both sides lost heavily.
![]()
The turn ended with the Mecklenburgers weakened but still numerous enough to continue their advance, whilst the Strackenzians had barely enough troops to mount even a token defence.
![]()
Turn 6
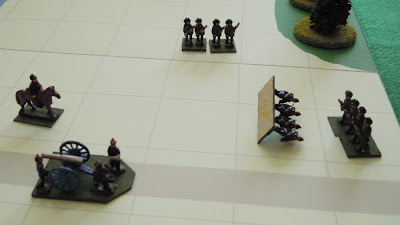
A further exchange of artillery fire resulted in the destruction of the Strackenzian artillery battery, but before the Mecklenburgers could push home their advantage a group of Strackenzian militia (made up entirely of members of the Sons of the Volsungs) burst out of the forest behind the Mecklenburgers!
![]()
This cause the Mecklenburg commander considerable consternation, and he hurriedly sent two of his infantry companies back to deal with the threat.
![]()
Unfortunately for the Mecklenburgers, the Sons of the Volsungs were all excellent shots (many of them were foresters and huntsmen) and they shot the first of the Mecklenburg infantry companies to pieces.
![]()
Turn 7
Whilst the Mecklenburg artillery battery moved away from the threat as quickly as possible, the second Mecklenburg infantry company closed with the Strackenzian militia ... and suffered the same fate as its sister unit!
![]()
It was now apparent that the Mecklenburgers had let the possibility of victory slip from their grasp.
![]()
Turn 8
Neither the Strackenzians nor the Mecklenburgers were now in a position to win the battle, but both sides realised that they could still lose it if they made the wrong decision what to do next. The Mecklenburg commander pulled his remaining units together around the bridge, and the Strackenzian commander – Marshal von Saldern – ordered his units to stay out of range of infantry combat.
![]()
Both sides remained in these positions until nightfall, at which point the Mecklenburgers retreated unhindered back down the road to the Strackenz-Mecklenburg border.
The Duchy of Strackenz was safe again – for the moment – and von Bismarck's plans had come to nought ... this time!
Conclusions
Joseph Morschauser’s FRONTIER rules produce very bloody battles that – once each side gets into combat with the other – can be over in a matter of minutes. What is important is the use of artillery to break up enemy attacks before they get too close and ensuring that you manoeuvre your units into the best possible position before you get into combat.
The extemporised printed card terrain worked very well and took only a matter of minutes to produce and piece together. The green card did not appear very green in the photographs (it is actually described as being emerald green on the packet), but the grey rather than black grid lines were visible but did not detract from the overall look of the battle.
I thoroughly enjoyed setting up this play-test, especially as it was the first wargame I have fought in months! I do like the simplicity of Morschauser’s basic rules, although the results of infantry combat are a bit too black-and-white for my personal taste (I remember now why I introduced a retreat option when I first began to modify the rules!).
I have plenty to think about and I have several ideas as to how the rules could be developed … and I might easily be tempted to run another play-test battle in the near future to try some of these ideas out.
The Prussians have put pressure on the Grand Duke of Mecklenburg to send troops into Strackenz 'to restore order' ... and he has rather reluctantly agreed to do as he has been asked. (This ensures, of course, that von Bismarck can claim that it is a German rather than a Prussian 'intervention'. The old boy was no fool!) To this end three infantry battalions and an artillery battery of the Mecklenburg Army have marched across the border and are making their way towards Strackenz City.
In response an infantry battalion (1st Battalion, Strackenz Grenadiers) and an artillery battery of the Strackenzian Army – under the leadership of Marshal von Saldern, the Constable of Strackenz – have taken up positions astride the road leading from Mecklenburg to Strackenz City. They have occupied the western side of the only bridge across the river ... a bridge that the invaders must cross if they are to reach Strackenz City.
The opening positions
The Strackenzians have occupied positions astride the road on the western side of the river.

The Mecklenburgers will emerge from the forest covering the Jotun Gipfel along the road from the Strackenz-Mecklenburg border.

Turn 1
The leading infantry company of the Mecklenburgers advanced down the road towards the bridge, followed by the rest of the battalion.

Turn 2
The Strackenzian artillery battery opened fire ... and hit and destroyed the foremost Mecklenburg infantry company!

The remainder of the leading Mecklenburg infantry battalion began to deploy. They were followed out into the plain by their commander and three companies of the second Mecklenburg infantry battalion.

Turn 3
The Strackenzian artillery fired for a second time ... and destroyed yet another Mecklenburg infantry company!

The Mecklenburgers were determined to get to grips with the Strackenzians as quickly as possible, and whilst two of their infantry companies advanced as quickly as they could towards the river, the rest of the Mecklenburg troops began to deploy behind them.

Turn 4
The Strackenzian artillery battery fired for a third time ... and missed! This gave the Mecklenburgers the opportunity to continue their deployment and to bring their artillery battery closer to the river.

Turn 5
The Strackenzian artillery battery opened fire on the Mecklenburg infantry company that was directly in front of it ...

... and destroyed it. The Mecklenburg artillery battery returned fire, but its shot landed behind the Strakenzian artillery battery.

Having gained the initiative this turn, the Mecklenburg infantry advanced, and several infantry companies began to wade across the river ... a course of action that the Strackenzians had expected.

The resultant fighting was intense, and both sides lost heavily.
The turn ended with the Mecklenburgers weakened but still numerous enough to continue their advance, whilst the Strackenzians had barely enough troops to mount even a token defence.

Turn 6
A further exchange of artillery fire resulted in the destruction of the Strackenzian artillery battery, but before the Mecklenburgers could push home their advantage a group of Strackenzian militia (made up entirely of members of the Sons of the Volsungs) burst out of the forest behind the Mecklenburgers!

This cause the Mecklenburg commander considerable consternation, and he hurriedly sent two of his infantry companies back to deal with the threat.

Unfortunately for the Mecklenburgers, the Sons of the Volsungs were all excellent shots (many of them were foresters and huntsmen) and they shot the first of the Mecklenburg infantry companies to pieces.

Turn 7
Whilst the Mecklenburg artillery battery moved away from the threat as quickly as possible, the second Mecklenburg infantry company closed with the Strackenzian militia ... and suffered the same fate as its sister unit!
It was now apparent that the Mecklenburgers had let the possibility of victory slip from their grasp.

Turn 8
Neither the Strackenzians nor the Mecklenburgers were now in a position to win the battle, but both sides realised that they could still lose it if they made the wrong decision what to do next. The Mecklenburg commander pulled his remaining units together around the bridge, and the Strackenzian commander – Marshal von Saldern – ordered his units to stay out of range of infantry combat.

Both sides remained in these positions until nightfall, at which point the Mecklenburgers retreated unhindered back down the road to the Strackenz-Mecklenburg border.
The Duchy of Strackenz was safe again – for the moment – and von Bismarck's plans had come to nought ... this time!
Conclusions
Joseph Morschauser’s FRONTIER rules produce very bloody battles that – once each side gets into combat with the other – can be over in a matter of minutes. What is important is the use of artillery to break up enemy attacks before they get too close and ensuring that you manoeuvre your units into the best possible position before you get into combat.
The extemporised printed card terrain worked very well and took only a matter of minutes to produce and piece together. The green card did not appear very green in the photographs (it is actually described as being emerald green on the packet), but the grey rather than black grid lines were visible but did not detract from the overall look of the battle.
I thoroughly enjoyed setting up this play-test, especially as it was the first wargame I have fought in months! I do like the simplicity of Morschauser’s basic rules, although the results of infantry combat are a bit too black-and-white for my personal taste (I remember now why I introduced a retreat option when I first began to modify the rules!).
I have plenty to think about and I have several ideas as to how the rules could be developed … and I might easily be tempted to run another play-test battle in the near future to try some of these ideas out.